Tag Archive: Vegetables

What’s sauce for the veal is sauce for the eggplant

Eggplant tonnato

Buenos Aires Herald
On Sunday supplement
Food and Wine

Around the world, anywhere there are Italians, you’re likely to find Vitello tonnato, that classic dish of slices of cold poached veal topped with a creamy tuna sauce. It’s one of those dishes that seems like it must go back in history to some far distant, early epoch. Different regions of Italy claim it as their own. Italian cooking authority (in English), Ada Boni, asserts it as a Lombardian dish but doesn’t delve into it. As best anyone seems to have researched it, the dish goes back to the late 19th century and although it likely graced the tables of fine restaurants in Milan, it also graced those of other regions.

Beyond the combination of veal (and traditionally, we’re talking unweaned calf, milk fed veal, not naturally raised veal) and tuna, all is fair game in both presentation and condiments. Oh, there are traditions, but they are often bent, stretched or ignored – egg yolk, capers or caper berries, lemons, chilies, and more come into play. Some insist the veal be roasted, others braised. Some cook the veal with all its condiments and then turn the juices into the sauce, others keep them separate. Some assert that the sauce be ladled over the veal well in advance to mingle the flavours, others prefer to keep them separate, even to serving them side by side.

Here in Argentina the dish is known as Vitel thoné, (also “toné or tonné”) I’ve found no history as to why it’s called this. Neither word is Spanish, neither word is Italian (where tonno would be the spelling, or tonni in plural). If anything it vaguely stretches to Latin, where “vitel” is the diminutive form the word for “yolk” and is sometimes used to refer to a very young calf; and thoné and its variations, well, your guess is as good as mine. In various languages it could refer to a unit of weight or a clap of thunder.

Having just toddled our way through the holidays, many of us have eaten our fill, not just of this particular dish, but of more meat than we probably should have, despite the carnivorous traditions of this country’s cuisine. One of the nice things about the development of cuisine is that over time, classic sauces, like a tonnato sauce, come to be used for other dishes. And, today, I’ll hit you up with a cold salad that makes a great starter to a light dinner.

If you really want to do this up right, make your own mayonnaise with olive oil, or to go more traditional, blend all the sauce ingredients together with a yolk and then slowly whisk in olive oil until you get the texture you want. It’s summertime, we want quick and easy. Use some olive oil mayo – there are some perfectly good commercial brands available.
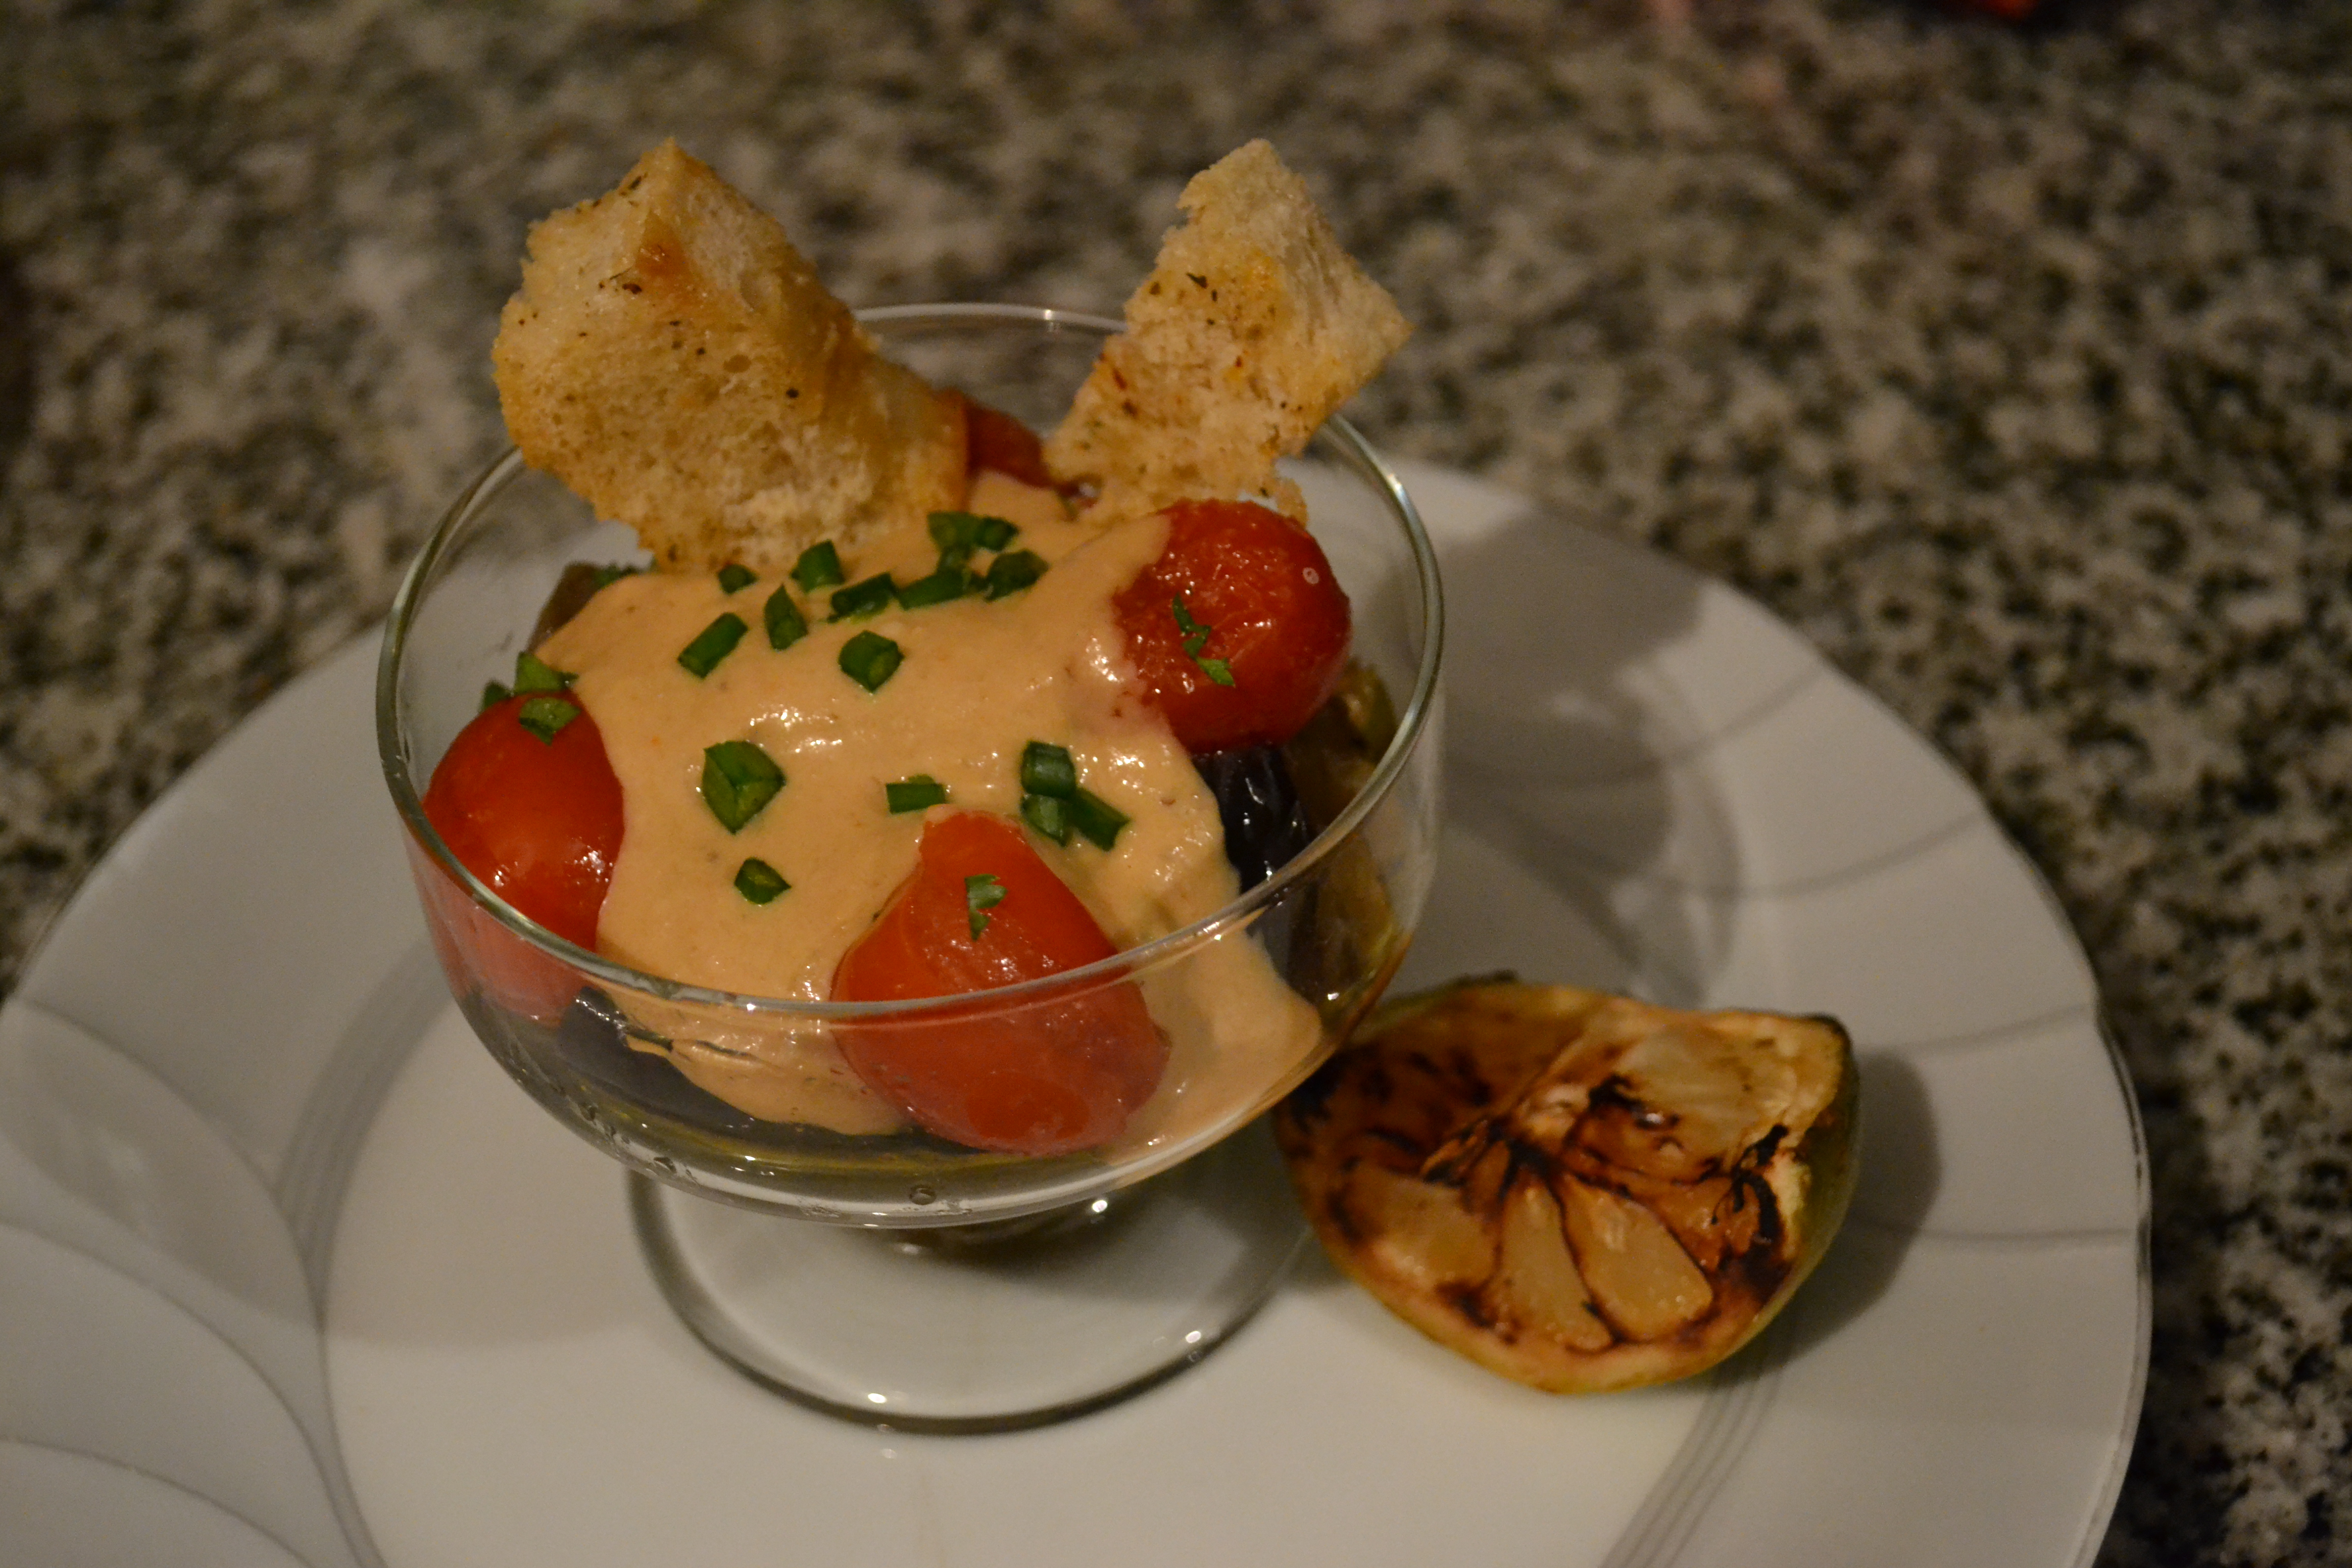
Eggplant “Tonnato”

1 large eggplant
16 cherry tomatoes
small baguette, 1-2 days old is best
olive oil

1 170gm can tuna, drained (roughly 120 gm tuna)
100 ml olive oil mayonnaise
1 teaspoon capers, rinsed
2 anchovies
1-2 teaspoons of chili sauce (a sambal or sriracha would be best)
1 green lemon, cut in quarters
chives, chopped
parsley, chopped
salt and pepper

Slice the eggplant into 1 cm thick slices, salt and leave to drain in a colander for 30 minutes. Rinse, pat dry. In a skillet over high heat brown the lemon quarters on both exposed sides. Set aside. Add olive oil to the pan and brown the eggplant slices until cooked through.

Meanwhile, place the cherry tomatoes with a little olive oil and salt in the oven and cook until they just start to burst (you can also do this on the stovetop).

Cut the crust off the baguette and cut the bread in cubes, drizzle with olive oil, sprinkle with salt, and bake in the oven until crisp and golden brown. Let all the ingredients cool to room temperature.

Put the tuna, mayo, capers, anchovies, chili sauce into a blender and blend until smooth. Season to taste with salt and pepper. Chill in the refrigerator for about an hour to let the flavors meld.

Toss the eggplant with the chopped parsley and divide up between four serving bowls. Distribute the cherry tomatoes around to look pretty. Spoon the sauce over the top, sprinkle with chives, add in a couple of croutons for some crunch, garnish with the charred lemon wedge. Dig in!

A series of recipes and articles that I started writing for the Buenos Aires Herald Sunday supplement, Food & Wine section, at the beginning of 2012. My original proposal to them was to take local favorite dishes and classics and lighten them up for modern day sensibilities. We’re not talking spa or diet recipes, but at the very least, making them healthier in content, particularly salt, fat and portion size. As time went by, that morphed into a recipe column that, while emphasizing food that is relatively “good for you”, wasn’t necessarily focused on local cuisine. At the beginning of 2013 I decided to stop writing for them over some administrative issues, but it was fun while it lasted.

Facebooktwitterredditpinterestlinkedinmail

In a pickle

Watermelon Pickle
Kiwi Relish

Buenos Aires Herald
On Sunday supplement
Food and Wine

Like many people in the food business I’m often asked what my favourite “X” is, be it a restaurant, a wine, an ingredient, or, pretty much anything, like, say, a “green vegetable”. My response to the last is simple. A good pickle. Closely followed by an olive. I realize that in and of themselves they’re not a green vegetable in natural state, but sometimes a bit of tweaking is needed to bring out the best in even something that Mother Nature provides.

When it comes down to it, I love pickled and brined sorts of things, be they corned beef or cucumbers or, something entirely different. But I’ll bet you didn’t know there’s a whole science behind it. Pickling, brining, corning, are all names for a process that involves preserving food through anaerobic fermentation in brine (i.e., salt dissolved in liquid) to produce lactic acid and/or marinating it in an acidic solution – most often vinegar, though that’s not a prerequisite. The result is some form of pickle with a salty and sour taste.

One particularly important aspect of the process is that the resulting pickle has an acidity level that drops below a pH of 4.6 – not to get too scientific or anything – but what makes that important is that it’s a sufficiently low pH to kill off pretty much any bacteria that are harmful to us human folk.

Rather than give you a recipe for some classic dill, half-sour, garlic-dill, or bread & butter pickle, much as many of us miss those, I thought I’d slip in a couple of favourites that we keep around the house, particularly during the summer as they make great accompaniments to many of the foods we eat during the hot months. And, they’re both really easy to make.

Watermelon Rind Pickle

Rind from half a large watermelon
4 cups sugar
2 cups white vinegar
1 tablespoon each of fennel seed, star anise, szechuan peppercorns
1 teaspoon cloves
2-3 whole cinnamon sticks
2 tablespoons coarse salt

This is a great way to use the leftover rind of a watermelon. Basically scoop out the pink flesh almost down to the rind. Peel the outer layer of skin off the rind. Cut in cubes roughly 1½-2 cm. In a pot that’s large enough to accommodate all the cubes of rind, bring the other ingredients to a boil, stirring occasionally to dissolve all the sugar. Turn off the heat, load in the cubes of rind which should be pretty much level with the liquid – mix well, cover, and leave for 10-12 hours.

Bring the whole potful back up to a boil over high heat, cover again and leave for another 10-12 hours. Repeat once or twice more until the pickles are soft with just a little crunch left – basically this is a two day process. When cooled after the last boiling ladle them into containers and store in the refrigerator. Watermelon rind pickles pair brilliantly well with grilled meats. Try them as something different from the usual accompaniments of salsa criolla and chimichurri.

Kiwi Relish

4 kiwis
1 onion
1 small green bell pepper
1 small red bell pepper
100 grams salt
225 grams sugar
160 ml vinegar
1 teaspoon celery seed
1 teaspoon mustard seed

Peel and dice the kiwis into a very small dice, about ½ cm. Dice the onion and peppers the same size. Place all the ingredients in a pot, bring to a boil, turn off the heat, cover, and leave for 6-8 hours before using. Makes a fantastic pairing with fish (amazing with salmon) and chicken – again, right off the grill during the summer is one of our favourites. Also can be used in place of a traditional pickle relish on sandwiches, hot dogs, hamburgers… you name it.

A series of recipes and articles that I started writing for the Buenos Aires Herald Sunday supplement, Food & Wine section, at the beginning of 2012. My original proposal to them was to take local favorite dishes and classics and lighten them up for modern day sensibilities. We’re not talking spa or diet recipes, but at the very least, making them healthier in content, particularly salt, fat and portion size. As time went by, that morphed into a recipe column that, while emphasizing food that is relatively “good for you”, wasn’t necessarily focused on local cuisine. At the beginning of 2013 I decided to stop writing for them over some administrative issues, but it was fun while it lasted.

Facebooktwitterredditpinterestlinkedinmail

Just be-causa

Tuna Causa

Buenos Aires Herald
On Sunday supplement
Food and Wine

Apparently all the predictions are holding true. Peruvian cuisine is the “it girl” of the cuisine world and it seems like every time I turn around here there’s another spot offering either home-style Peruvian food or some version of Peruvian or Andean fusion. Most often the latter seem to be a melding of Japanese into the mix, but there are other Asian influences, Mediterranean, and no doubt any moment, something Eastern European will show up. It’s sort of surprising no one’s opened an Argentine-Peruvian fusion spot yet. It’s coming, you heard it here first.

We’re not immune from the phenomenon, though, given that my partner is Peruvian, so there tends to be a lot of experimentation going on around the house. But most of the time we tend to stick with the tried and true for our own dinners – there’s so much to play with, and, let’s face it, the food is good just the way it is.

So, everyone who remembers their mother’s tuna fish casserole, raise your hand. There were a legion of recipes for that icon of 1950s and 1960s norteamericano cuisine. Let’s face it, there was no other possible use for Campbell’s Cream of Mushroom soup that didn’t involve patching a hole in the drywall. The biggest variation, and cause of many a neighborhood argument, was whether or not it should be topped with crumbled potato chips or French’s fried onion rings. The same argument raged over green bean casseroles, but that was a holiday dish. Tuna casserole was weekly fare.

It turns out that similar arguments were surging throughout Peru. It may actually be that canned tuna is at the root of much evil in global society, and may bear further investigation. The addition of canned tuna to the classic Peruvian mashed potato dish, causa, was no doubt an improvement in the nutritional content of the dish, since prior to that it seems it was not much more than cold seasoned mashed potatoes, but it has also led to arguments amongst the Peruvian foodie community over authenticity and limits on creativity.

Regardless, these days, the tuna causa is ubiquitous throughout the nation, and despite the fancier versions showing up on menus here with shrimp, octopus, chicken, and other proteins, it remains about as classic as it gets without going back to a plain potato dish. Here’s our home staple these days – though we don’t make it every week. My mother might have even been proud to serve this.

Tuna Causa

Potato base:

3 large potatoes
80 ml olive oil
2 tablespoons ají amarillo powder
juice of 1 lemon
salt and white pepper
Boil, peel, and mash the potatoes. Add the olive oil a bit at a time, to taste and until it has a nice smooth consistency. Add the lemon juice. Season with salt, pepper, and the ají amarillo to taste – you could also use chopped or pureed fresh or reconstituted dry peppers – this is a mild yellow pepper (spicier than a bell pepper, but mild). Form it into the base of your presentation on a platter and chill in the refrigerator for ½-1 hour just to firm it up a bit. This dish is generally served cold or room temperature.

Tuna layer:

3 cans of tuna (I like to use the water packed)
1 small red onion, chopped
mayonnaise
salt and white pepper

This is pretty much just a simple tuna salad. Mash the tuna, add the onions and enough mayonnaise just to make it moist and hold together. Season to taste.

Assembly:

Potato base
Tuna salad
1 tomato, seeded and diced
1 avocado, peeled and sliced
1 rocoto or other medium hot pepper
2 hard boiled eggs, sliced
chopped black olives
chopped parsley and cilantro
juice of 1 lemon

You should have a nice, firm mashed potato base to build on. Top with chopped tomato and herbs. Layer the tuna salad on top of that. Next, the avocado slices sprinkled or brushed with the lemon juice so they don’t brown. Then the hard boiled egg slices (you can hard boil your eggs along with your potatoes above, just don’t leave them in the water the entire time) and the pepper rings. Scatter the chopped olives over the whole thing. Set it on the table, ooh and ahh a little, dig in.

A series of recipes and articles that I started writing for the Buenos Aires Herald Sunday supplement, Food & Wine section, at the beginning of 2012. My original proposal to them was to take local favorite dishes and classics and lighten them up for modern day sensibilities. We’re not talking spa or diet recipes, but at the very least, making them healthier in content, particularly salt, fat and portion size. As time went by, that morphed into a recipe column that, while emphasizing food that is relatively “good for you”, wasn’t necessarily focused on local cuisine. At the beginning of 2013 I decided to stop writing for them over some administrative issues, but it was fun while it lasted.

Facebooktwitterredditpinterestlinkedinmail

Soup with a chill

Watermelon gazpacho
Chilled green bean sopu

Buenos Aires Herald
On Sunday supplement
Food and Wine

Anyone who knows me knows that I’d be perfectly happy to live on soup, day in and day out. Well, and maybe pasta. And sushi. And, well, okay, not so much day in and day out, but I like my soup and am happy to eat it on a regular basis. Here in Argentina soup is not a commonplace menu item. There are rich, hearty stews like locro and lentejas, but a simple bowl of soup, other than the sudden appearance of cream of squash soup that seems to happen every fall, is hard to find.

I blame it on Mafalda, the nationally treasured cartoon character who despite not having been published for going on 40 years seems to maintain a massive influence on people’s attitudes about politics, culture, and, soup. She wasn’t much for the stuff, and it seems that devotees of her are not either. There was even a study done in 1998 that showed a remarkable inverse correlation between those who considered themselves fans of hers and those who considered themselves fans of soup.

When hot weather rolls around we start to think about chilled soups here at home. They make great lunches with a nice bit of fresh bread from the oven, or the bakery, and they also make a great start to an evening’s repast. Here are a couple of favourites, just to start the season. I may get a little more elaborate down the line, we shall see.

Watermelon Gazpacho

1 large wedge of watermelon (enough so that the pulp will pretty much fill a standard blender)
1 red bell pepper
1 green bell pepper
1 yellow bell pepper
1 onion
1 cucumber
2-3 chilies
2-3 cloves of garlic
1 bunch basil
60 ml good olive oil
60 ml red wine vinegar
salt and pepper

Some people like their gazpacho pureed, others like it chunky. I fall somewhere in between. I puree a part of it and leave the rest in small dice. If you’re not a watermelon fan, replace the watermelon with 7-8 plum tomatoes and proceed.

Remove as many seeds as you can from the watermelon and take it off the rind. Pack the flesh into a blender along with the chilies, garlic (start with 1-2 each and work your way up until you get the flavor you like), basil, olive oil and vinegar. Blend until smooth, strain to remove any remaining seeds that you might have missed. Season to taste with salt and pepper. Dice the bell peppers, onion and cucumber (peeled or not, your choice) and add to the pureed soup in a large container that will fit in your refrigerator. Chill until it’s quite cold, four or five hours minimum. Serve with a crusty bread loaf and enjoy!

Chilled Green Bean Soup

Everyone makes chilled pea soup, why not do something a little different?

½ kg green beans (either French or Italian – round or flat)
3-4 leeks
1 large potato
2 tablespoons butter
1 liter vegetable stock (from cube or homemade)
1 bunch mint
2 teaspoons salt
1 teaspoon white pepper
½ teaspoon ground cloves
200 ml cream
pea sprouts or watercress to garnish

Clean the leeks well and coarsely chop them. Cook them with the butter over the lowest flame your stove will manage until they’re soft – “sweating” them. Peel and dice the potato and add it to the pot along with the seasonings and the vegetable stock. Turn the heat up, bring to a boil and then simmer until the potato is cooked through.

Meanwhile, “blanch and shock” the green beans and mint. If you ever wondered just what that meant – bring a pot of lightly salted (1 tablespoon/liter, roughly) water to a boil. Add the green beans, trimmed of their ends, and cook until they turn bright green and just soften – about 5 minutes. Add the mint and simmer for just about 10-15 seconds longer. Drain the beans and mint through a colander and then plunge them into very cold, preferably iced, water to stop the cooking and set the bright green color.

When both these components are ready, puree them together in a blender. Add most of the cream, reserve a little for decoration. Chill well, about 4-5 hours. Serve topped with a drizzle of the cream and the fresh pea sprouts or watercress.

A series of recipes and articles that I started writing for the Buenos Aires Herald Sunday supplement, Food & Wine section, at the beginning of 2012. My original proposal to them was to take local favorite dishes and classics and lighten them up for modern day sensibilities. We’re not talking spa or diet recipes, but at the very least, making them healthier in content, particularly salt, fat and portion size. As time went by, that morphed into a recipe column that, while emphasizing food that is relatively “good for you”, wasn’t necessarily focused on local cuisine. At the beginning of 2013 I decided to stop writing for them over some administrative issues, but it was fun while it lasted.

Facebooktwitterredditpinterestlinkedinmail

No fat wrap

Vegetable wraps

Buenos Aires Herald
On Sunday supplement
Food and Wine

It had to come up sooner or later, someone was going to ask about “fat free vegan” options for something at home. Something that wasn’t just an undressed salad or crispy rice cake. Thankfully, at least this time, they didn’t throw in “gluten free” or I might have just given it all up as a bad day. Combine that with just having worked my way through a couple of books on the subject and I was ready to tackle something new in the kitchen.

I don’t know that I need to get into the pros and cons of either a vegan lifestyle or an ostensibly fat free one. There’s plenty of source material out there that comes down on either side of the questions, and I think I can safely leave it in your hands to make your own decisions about what works for you. Want to go the other direction and head to a carb-free, meat heavy diet, you’re good to go from my perspective – whatever works for you.

I would say that I find the combo a bit restrictive. It’s not that one can’t come up with some great food to eat, and hopefully today’s recipe will give you a good example. It’s more that there’s so many ingredients out there that a diet like this leaves out – it’s one that I could never commit to without some overriding reason. But, as a change up for meals once or twice a week, it’s certainly a good balancer to whatever else I might be ingesting.

So what does a fat free vegan diet leave out? Beyond the obvious “no meat or dairy products”, including eggs, and, for most vegans, honey as well, the fat free restriction eschews chocolate, nuts, avocados, and all plant-based oils and fats – which, by the way, includes leaving out a large number of soy products unless they’re low fat versions. It’s not truly fat free, many vegetables and grains contain some level of fat naturally, but it’s a “no added fat” and no members of the plant kingdom that contain excessive amounts. Most folk who adhere to the diet are doing it for cardiovascular reasons, and so often, there’s a no added salt restriction.

So what that means is getting creative with vegetable purees, juices, herbs and spices for flavorings, generally some form of legume for those creamy mouthfeel sorts of experiences. And, that’s what we’re going to do today – a healthy, vegetable based wrap that makes for a satisfying lunch or lighter dinner. And, away we go.

First, the wrap – a whole wheat tortilla. You’d be surprised how easy these are to make – a simple 1:1 weight ratio between finely ground whole wheat flour and water – we get six decent sized tortillas out of:

175 grams whole wheat flour
175 ml/grams water
½ teaspoon salt (optional)
½ teaspoon smoked paprika

Mix well with a whisk to break up any lumps and let sit for about ten minutes to hydrate the flour. Heat a heavy skillet over medium heat. Divide the dough in six equal portions (or, 4 or 8, depending on how big you want them) and roll out to about a 20 cm circle. Lay them one at a time in the hot skillet – no oil needed. Cook until it’s lightly browned on the underside and then flip it over and cook the second side to the same. It should still be quite flexible. Repeat with each remaining tortilla.

For the filling:

¼ of a small red cabbage
¼ of a small white cabbage
2 green onions
1 medium carrot
4 asparagus
4-5 stems of cilantro
1 can white beans

1 can chickpeas
Juice and zest of 1 lemon
½ teaspoon cumin
1 small chili
2 cloves garlic
1 small carrot
1 tablespoon sesame seeds, toasted (optional, they add some fat)
water as needed

Slice the cabbage into thin shreds. Chop the green onion, asparagus and parsley. Grate the carrot. Open the can of beans. Toss them all together in a bowl.

Open the can of chickpeas – essentially we’re making a no fat added hummus. Pour the can into the blender and add the other ingredients. Blend at high speed, only add water as needed to get a smooth puree. Mix the puree with the vegetables and pile into the tortilla wraps. Roll up (if you want to make it pretty, stick a toothpick in it to hold it all together). Eat. Feel free, by the way, to mix up the vegetables with others, to use a different herb or a mix of them, and adjust the spiciness of the dressing with more or less of the chili and garlic.

A series of recipes and articles that I started writing for the Buenos Aires Herald Sunday supplement, Food & Wine section, at the beginning of 2012. My original proposal to them was to take local favorite dishes and classics and lighten them up for modern day sensibilities. We’re not talking spa or diet recipes, but at the very least, making them healthier in content, particularly salt, fat and portion size. As time went by, that morphed into a recipe column that, while emphasizing food that is relatively “good for you”, wasn’t necessarily focused on local cuisine. At the beginning of 2013 I decided to stop writing for them over some administrative issues, but it was fun while it lasted.

Facebooktwitterredditpinterestlinkedinmail

Thistle me a tune

Artichoke preparation

Buenos Aires Herald
On Sunday supplement
Food and Wine

When the same question pops up in your life several times in one week, with no particular impetus, the universe is trying to tell you something. Or, it’s just a coincidence. Pretty much the same thing. But it does get you thinking, or me thinking. So when three different people this week asked me “How do you prepare an artichoke?” it became a part of my daily thoughts. Fit in somewhere around waiting six days for the local cable conglomerate to get around to fixing service here in the ‘hood.

It’s one of those things I learned to do in cooking school a long time… more than a generation, ago. Maybe two. And it became something that I simply do, without thinking about it. But I get it, I mean, who thinks about preparing an artichoke? They’re pretty, but they’re daunting. It’s probably why my mother never did anything with them but snip off the tips of the “leaves” and then steam the heck out of them so that we could pluck them and scrape off the juicy “meat” at the bottom. I never had an artichoke any other way until I was out in the world, working in the restaurant industry.

So first off, just what is an artichoke? We’ve all seen them. Right now they’re in season here in BA and piled high in every verdulería. A month ago my neighborhood stand was selling them for 7 pesos apiece. This morning they were offering them up 4 for 10. Look at them closely – they look like a sort of scaly greenish pinecone or maybe something out of Avatar. What they are is a flower. A thistle flower. Actually, an immature flower surrounded by protective leaves. Now, as to what artichokes think they need protection from, I have no idea. But they’re protected.

There are several kinds of artichokes out there, either green or purple or a mix. All of them originated in Sicily, and from there, spread to wherever Sicilians and then later, Italians spread. The large green ones we see here are either the Camus de Bretagne or the Blanca de Tudela variety – I doubt I could tell the difference side by side, the biggest difference is simply size – unless you want to get into DNA testing. Argentina and Chile combined produce about 36% of the world’s artichokes. Who knew?

So, let’s get to it. I’ve provided a sort of step-by-step photo guide to see what the vegetable should look like after each process. Hopefully that’ll help.

1) set your artichoke on a cutting board. 2) using a large, sharp knife, cut across it about 2 cm from the base of the flower. 3) Turn it around and using a vegetable peeler, peel the stem down to the light green inner part (which is edible too). 4) Back to that big knife, place the cut side of the artichoke down on the board and just cut around on an angle, taking off the leaves and exposing the outer edge of the heart. 5) With a small knife, basically scrape out the seam between the stem and the heart that you can’t quite get to with either peeler or the big knife. 6) Get a spoon and stick in alongside the hairy “choke” in the center and then work it around in a circle to scoop out the choke. 7) Use the spoon to scrape out any remaining hairs, so to speak. 8) For this recipe, cut it in half lengthwise – though this will depend on what you’re going to make with them – and, stick them in a bowl of water with some lemon juice or vinegar to prevent them from turning brown in the air.

Artichokes “in Escabeche”

8 artichokes (1 little over a kilo)
1 lemon, cut in half and squeezed into a large bowl of water
240 ml extra virgin olive oil
1 bay leaf
3 large cloves garlic, peeled
½ teaspoon salt
1 tablespoon good quality sherry or fruit vinegar and more for drizzling
Extra virgin olive oil for drizzling

Prepare the eight artichokes as above and put in the bowl with the lemon water.

In a skillet, heat the olive oil over medium to medium-high heat until nearly smoking, about 10 minutes of preheating, then cook the artichoke hearts with the bay leaf until golden brown on the outside and until a skewer or knife tip glides to the center of the artichoke heart without too much resistance, about 5 to 6 minutes. Remove from the oil with tongs or a slotted spoon and transfer to a shallow serving platter or bowl.

Meanwhile, pound the garlic with the salt in a mortar. Stir 3 tablespoons of the oil you cooked the artichokes in into the garlic, ½ tablespoon at the time. Now, stir in the vinegar ½ teaspoon at a time until the garlic is a creamy looking sauce. Spoon small amounts of this mixture over the artichokes. Drizzle the artichokes with olive oil and a splash of vinegar and set aside to cool and absorb flavors before serving. Season with salt and pepper if necessary.

A series of recipes and articles that I started writing for the Buenos Aires Herald Sunday supplement, Food & Wine section, at the beginning of 2012. My original proposal to them was to take local favorite dishes and classics and lighten them up for modern day sensibilities. We’re not talking spa or diet recipes, but at the very least, making them healthier in content, particularly salt, fat and portion size. As time went by, that morphed into a recipe column that, while emphasizing food that is relatively “good for you”, wasn’t necessarily focused on local cuisine. At the beginning of 2013 I decided to stop writing for them over some administrative issues, but it was fun while it lasted.

Facebooktwitterredditpinterestlinkedinmail

A-maize-ing

Mexicali Corn

Buenos Aires Herald
On Sunday supplement
Food and Wine

You all know what corn is, right? Raise your hands if you do. Good, most of you anyway. Corn, or, more properly in most parts of the world, some variation on maize (the word derives from the native Taíno language where it is simply maiz, directly adopted into Spanish), is the most widely grown crop in the Americas, despite attempts to change that over to soy.

What you may not know is that it’s a hybrid plant. You go back a couple of thousand years and you find two entirely different plants that at some point either naturally or through human manipulation, were crossbred to produce some variety or another of maize. And there are some varieties – at least a couple of hundred different ones – there are more than a hundred just of what we think of as yellow (or white) sweet-corn. That doesn’t begin to get into the variations on colors that are available, the types with very large kernels common in the Andes, or the sorts used for making popcorn.

And, there are more recipes for what you can do with these golden ears of goodness than I’d care to count. On or off the cob, pureed, mashed, whole, boiled, steamed, fried, grilled, the list goes on and on. So I won’t.

Back when I was growing up in the 60s in the Midwest of the U.S. there was a sudden interest in “Mexican food”. We’re not talking about anything that anyone in Mexico would have recognized as Mexican cooking, but there was just this sudden appearance of dishes in all the ladies’ cooking and home magazines that included the just as suddenly available chili powders and other ingredients purported to make things… Mexican. Somewhere around that time the earliest versions of what came to be called Cal-Mex cooking, a sort of fusion of southern California ingredients and sensibilities with ideas and flavors supposed to be from Mexico. Some folks called it, early on, Mexicali instead, but that never really caught on, with the exception of one dish that took North American home economics kitchens by storm… Mexicali Corn.

As to just what the dish is, or was, seemed to vary with the magazine it was presented in. And with time, the ingredients have changed from those early years to much more elaborate, and, fresher ones. I’m pretty sure that when my mother prepared it (or, more likely, bought in lovely plastic bags of pre-mixed and frozen from either Birdseye or Green Giant), it contained corn, green and red bell pepper, maybe some onion, and a dash of the ever so exotic at the time, “chili powder”.

The thing is, the stuff is good. It’s really good. Especially if prepared right, with lovely fresh ingredients and spices. And that’s just what we’re going to do here. We tend to serve it alongside everything from grilled or sauteed chicken breasts to fish to whole, rice-stuffed calamari. Have fun with it!

Mexicali Corn

4 ears of fresh corn, still in the husk
1 red onion
1 red bell pepper
1 green bell pepper
3-4 cloves of garlic
2 jalapeños
1 teaspoon ground cumin
1 teaspoon ground coriander
1 small bunch of cilantro
2 limes
2 tablespoons of olive oil
salt and pepper

Once again we’re going to either fire up the grill or put a cast iron skillet on the stove top over high heat. Keeping the corn in the husk allows us to grill them until the kernels soften and lightly color, while the husk burns a bit but protects the corn itself. If your corn is already peeled you can cook it the same way, just turn it more often to prevent it from burning. Once you’ve grilled them well on all sides, remove them from the heat, let them cool, strip off the husk, and cut the kernels off the ears. The easiest way to do that is cut the ears in half across, stand the now flat cut surface on your cutting board, and use a good sharp knife to cut down along the cob in four or five cuts, top to bottom.

Chop the onions, peppers, garlic and cilantro. In a frying pan heat up the olive oil. Saute the onions, garlic, peppers and spices with a little salt and pepper until soft. Add the corn that you’ve cut off the cobs. Cook for 2-3 minutes just to blend the flavors. Off the heat, finish by tossing with the chopped cilantro and the grated zest of the two limes. Adjust the seasoning to your tastes with salt and pepper.

A series of recipes and articles that I started writing for the Buenos Aires Herald Sunday supplement, Food & Wine section, at the beginning of 2012. My original proposal to them was to take local favorite dishes and classics and lighten them up for modern day sensibilities. We’re not talking spa or diet recipes, but at the very least, making them healthier in content, particularly salt, fat and portion size. As time went by, that morphed into a recipe column that, while emphasizing food that is relatively “good for you”, wasn’t necessarily focused on local cuisine. At the beginning of 2013 I decided to stop writing for them over some administrative issues, but it was fun while it lasted.

Facebooktwitterredditpinterestlinkedinmail

Veg on a spike

Vegetable brochettes

Buenos Aires Herald
On Sunday supplement
Food and Wine

With spring arriving on our doorstep the verdulerías are in bloom with a riot of color. Beautiful vegetables are piled high and calling out to be used for something, anything. And, it’s time, if you have one, to start thinking about breaking out the parrilla – scrape off all that crusty stuff left from the last barbecue – you know you said you’d get to it another day and then forgot about it. Go look, really.

Of course, not everyone has a grill at home, and for those who don’t, there’s nothing wrong with a stovetop grill, ridged or not, or even a bit hulking frying pan, preferably something heavy like cast iron. Most of the year we can’t quite get ourselves to spend the time firing up the charcoal, it’s a whole lot easier to stick the plancha on top of a couple of burners and crank the flame up underneath.

So now that we’ve got all that out of the way, some heat in the offing, and vegetables that you enjoy piled up on the counter, it’s time to get to work. We’re going to make brochettes, kebabs, skewers, spiedos, pinchos, whatever name it is you like to use. You’re going to need skewers, whether metal (much preferred for this), or wood. If you use the latter, soak them in water for an hour or two before threading the vegetables on them, it will cut down on them burning.

So here’s dinner at our house when we’re in the mood to stick a veg or two on a spike….

Vegetable Brochette

1 large onion
1 green bell pepper
2-3 red frying peppers (ají vinagres)
4-6 mushrooms
1 medium eggplant
1 medium zucchini
2 tomatoes
salt and pepper
olive oil
salsa verde

Basically, cut all the vegetables into wedges or pieces that are 2-3 cm across. Wedges are great where possible, squares, rounds, whatever works for you. And then, poke the skewers through them, mixing up the vegetables so that they look pretty. Sprinkle them with salt and freshly ground pepper, and then drizzle them lightly with olive oil on all sides.

Onto the grill with the skewers – it should be really hot to start with, we’re looking to just get a bit of a sear, or caramelization, on the surface of the vegetables. Turn them after you get a little bit of color, maybe 1-2 minutes, and just do that until all sides have a touch of browning.

At this point, turn the heat to low, or move the skewers to a low heat part of the grill. Take your salsa verde and brush the upper surface of the brochettes, and then turn that to face down. Keep doing that every couple of minutes until the vegetables are cooked through – in total, we’re looking at about 5-6 minutes for the first part of browning, and then maybe 12-15 minutes of cooking over lower heat, regularly brushing on our sauce.

When they’re cooked through and nicely browned, serve them up on a platter alongside some simple rice – whatever your preference is for type. When we can get it, we love to use wild rice or a mix of wild and white.

Salsa Verde (Green Sauce)

This is one of our staples in the kitchen, it’s incredibly simple to make, and pairs well with vegetables, meat, pasta, gnocchi – really, wherever you want an intense herb flavor. Traditionally it’s not a vegetarian sauce, but there’s an easy fix for that.

1 large bunch of mixed fresh herbs (parsley, chives, cilantro, dill – whatever you like)
1 handful of arugula leaves
3-4 anchovies (if you want to keep this vegetarian, use a tablespoonful of miso paste instead)
2 garlic cloves
1 tablespoonful of capers
6 green olives, pitted
100 ml good olive oil
salt and pepper

Put everything into a blender or food processor, set to stun, and go for it. When it’s nicely pureed (add more oil if needed to get a smooth puree), adjust the seasoning to your tastes and start using.

A series of recipes and articles that I started writing for the Buenos Aires Herald Sunday supplement, Food & Wine section, at the beginning of 2012. My original proposal to them was to take local favorite dishes and classics and lighten them up for modern day sensibilities. We’re not talking spa or diet recipes, but at the very least, making them healthier in content, particularly salt, fat and portion size. As time went by, that morphed into a recipe column that, while emphasizing food that is relatively “good for you”, wasn’t necessarily focused on local cuisine. At the beginning of 2013 I decided to stop writing for them over some administrative issues, but it was fun while it lasted.

Facebooktwitterredditpinterestlinkedinmail